

Creating a GPO in order to set User Rights Assignment completely in PowerShell: Can it be done?
This series of posts aims to share some interesting things learned about how GPOs are structured and things discovered about what backup-gpo and import-gpo routines are doing within the Powershell GPO module. The research was limited to User Rights Assignments and scripting up such a GPO – with absolutely no warranties what so ever!
Remember that changing security settings and user rights assignments can cause issues.
It turnns out that there is another way that this can be done by creating a blank GPO and creating the relevant files directly in SYSVOL in around 10 lines of code but this does feel even more dangerous / hacky to me.
Create a GPO for User Rights Assignment in Powershell
One of my colleagues asked me if we could script up an end-to-end GPO that would add in some Deny elements within the User Rights Assignments section. I immediately replied with “yeah sure, no worries” with a vague recollection that there was now a bunch of GPO commands like New-GPO that could create a GPO and command-lets that let you set registry values (Set-GPRegistryValue).
Some time later I discovered that actually…. NO.. No it is not possible to script up a full GPO to do what we wanted. It is possible to make a new empty GPO, Link it, add registry settings but if there is a need to add Deny Logon type elements to the Security node under User Rights Assignment, this is not currently possible.
This discovery disappointed me to say the least. What other options are available?
Before moving any further let’s talk about what our given scenario was:
We would like to script up a GPO that will allow us to dynamically inject the usernames and groups that we want to be denied access to various User Rights Assignment elements in a GPO.
Of course, you could make a GPO through the GUI and then export it as a Backup using the Backup-GPO command and then save that somewhere and you could just import that GPO using Import-GPO. In our scenario, this just won’t cut it. We need to be able to inject our own account and group names – If we just blindly import, we’ll just get a bunch of stuff that may or may not be valid based on some statically exported values.
This got me thinking: what if we could Back up a GPO, get the resultant files prepared in such a way that we can replace the relevant values in the files that it creates with the user and group names of the things we want inside the GPO, and THEN run the Import-GPO command?
Before we jump down that rabbit hole, let us consider what gets created by the backup-gpo command-let in the specific scenario we are looking at.
What’s in an Empty GPO?
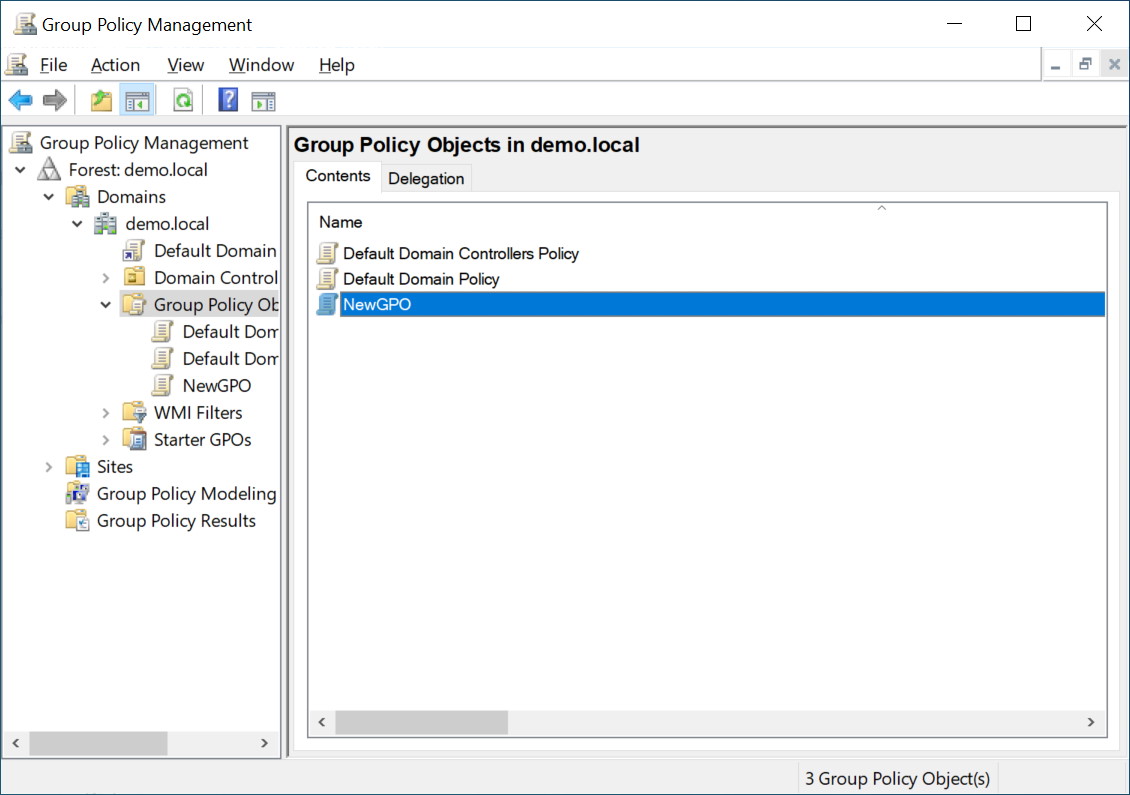
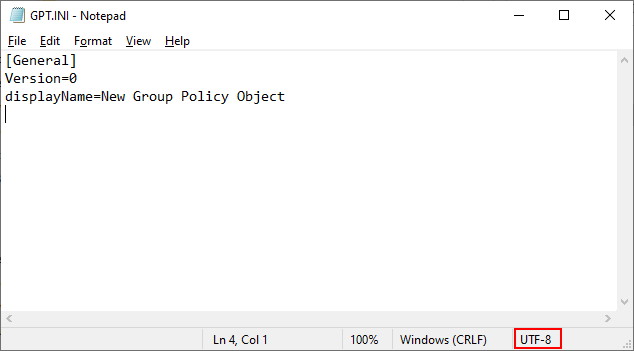
In order to back up a GPO, we first need a GPO to back up. In our example, we will create a GPO called “NewGPO”
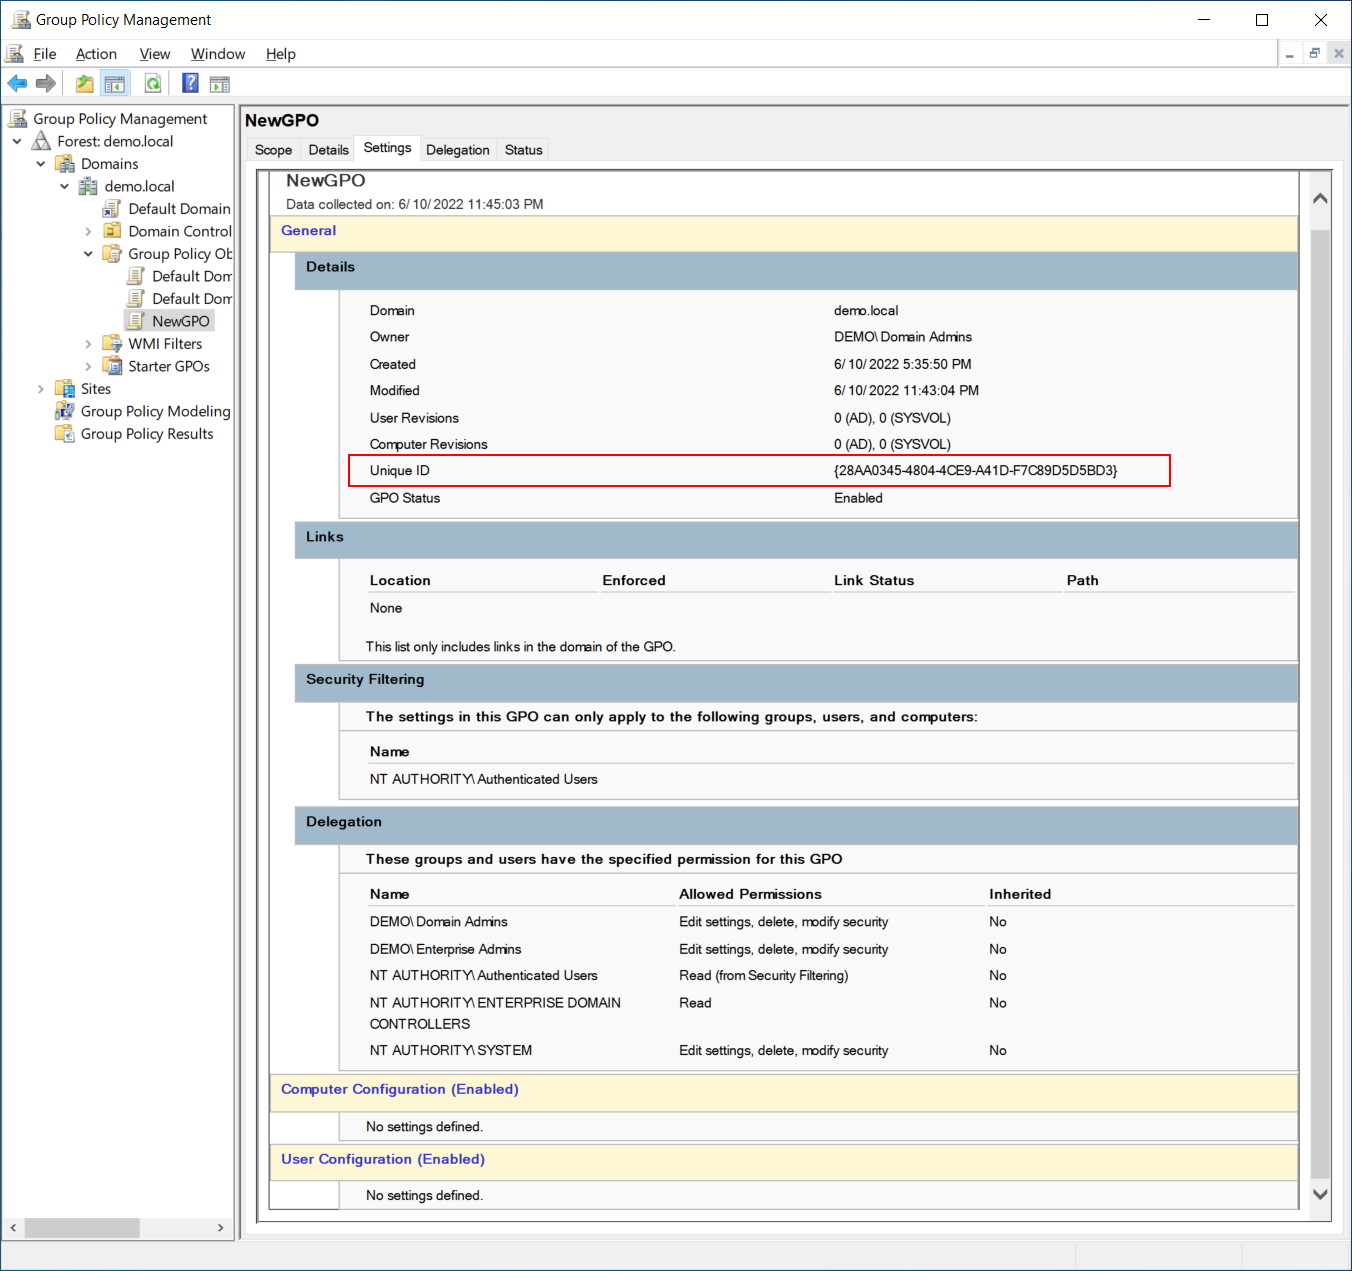
Looking at this GPO, we can see that it is empty. The only thing of note for us is the Unique ID (GUID) of {28AA0345-4804-4CE9-A41D-F7C89D5D5BD3}
We will find this policy “{28AA0345-4804-4CE9-A41D-F7C89D5D5BD3}” under sysvol. In the filesystem, it looks like this:
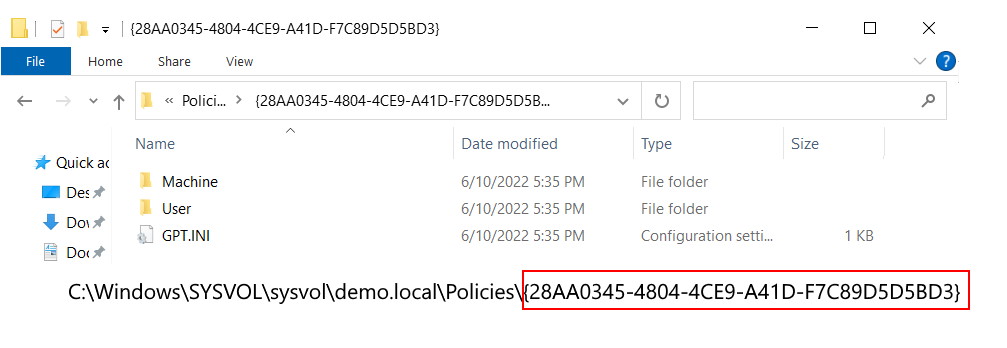
The first folder “Machine” is the structure for Computer related elements.
The second folder “User” is for User related Policy Elements.
Since our GPO is empty, both folders will also be empty. However there is a file called “GPT.INI” in the root of this folder (note that the filename is in capital letters – strangely, capitals only when created not restored). At this point the GPT.INI contains the GPO Version (how many times the policy has been modified and saved) and displayName of the policy as shown in the console. The encoding for this file is “UTF-8” (see screenshot below as an example):
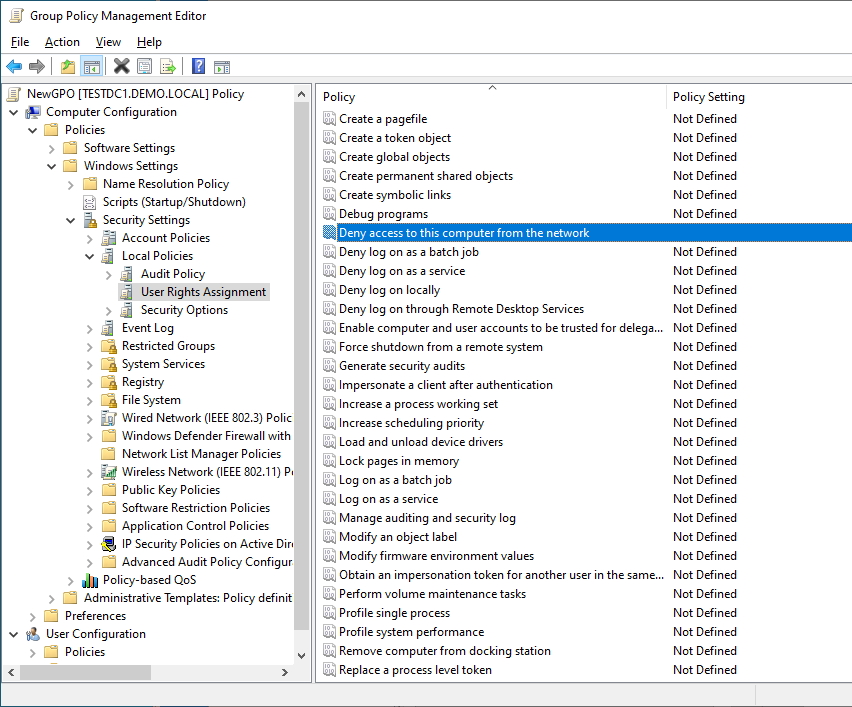
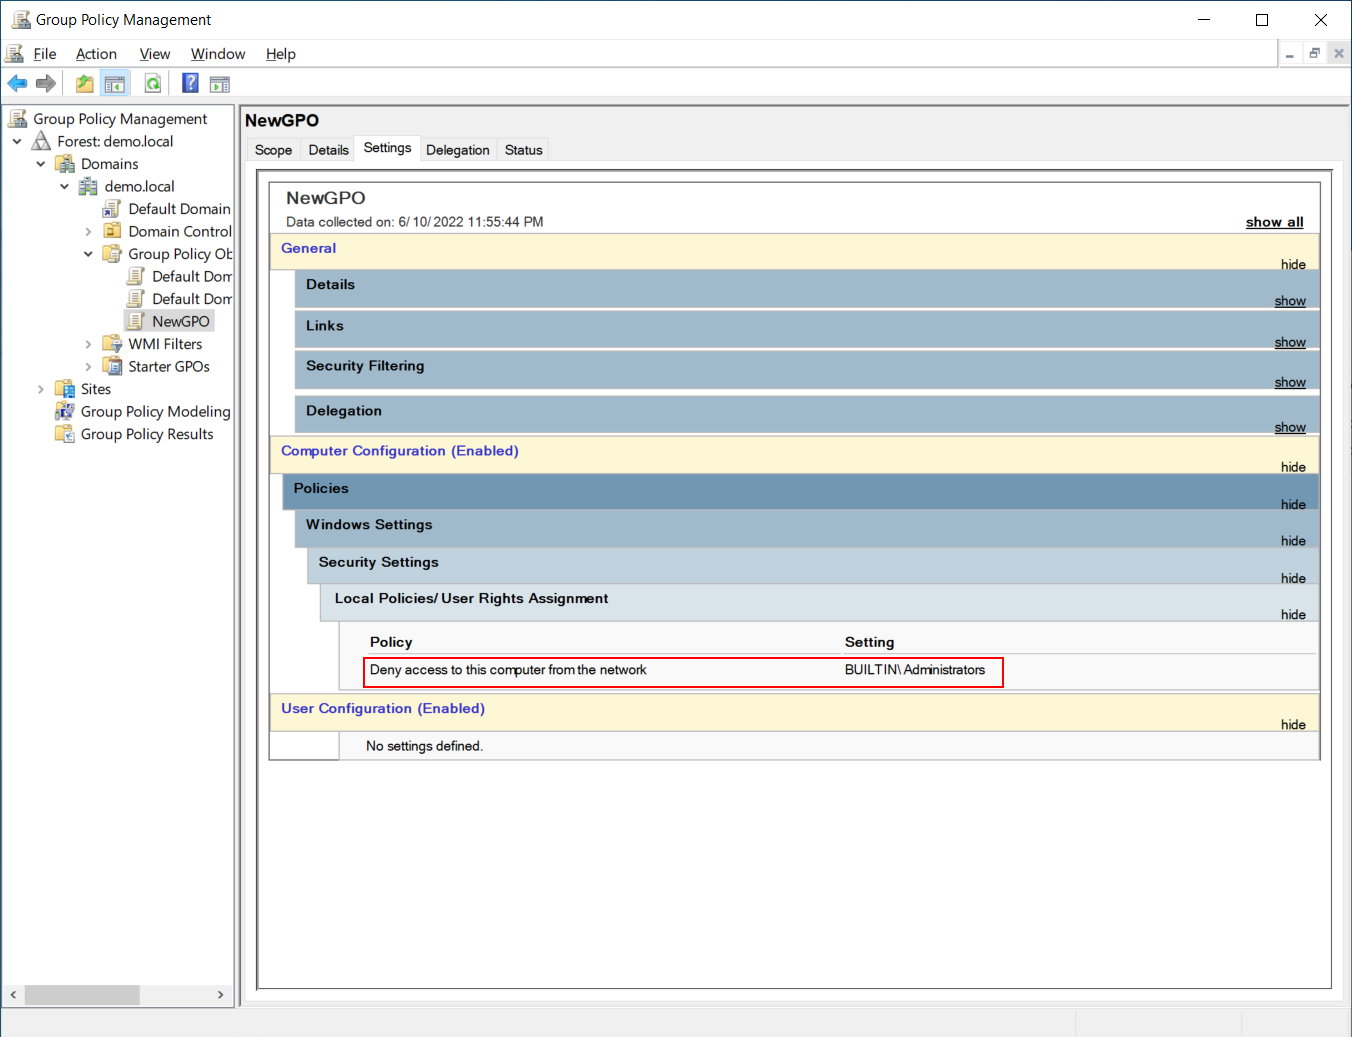
A GPO with one User Rights Assignment value set
Lets go back into our GPO and create a single element for Deny Access to this computer from the network and set it for Administrators as pictured below:
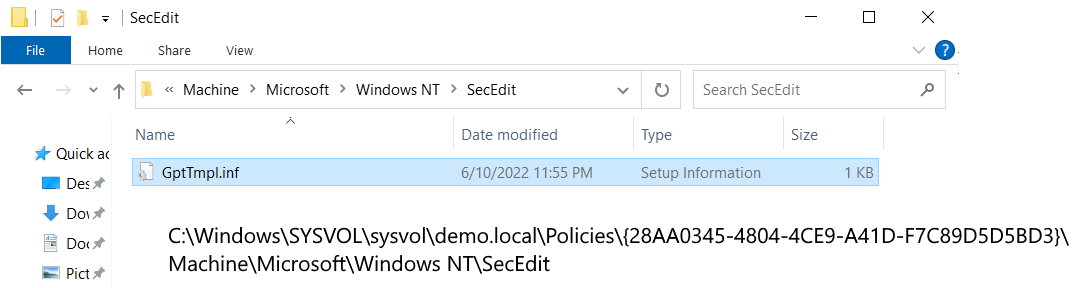
If we walk the filesystem under SYSVOL as we did earlier, we will find that everything is the same, except that the “Machine” folder tree now has a subfolder \Machine\Microsoft\Windows NT\SecEdit containing a single file called GptTmpl.inf
 The GptTmpl.inf file contains information relating to our User Rights Assignment. The encoding for this file is “UTF-16 LE” (“Unicode”):
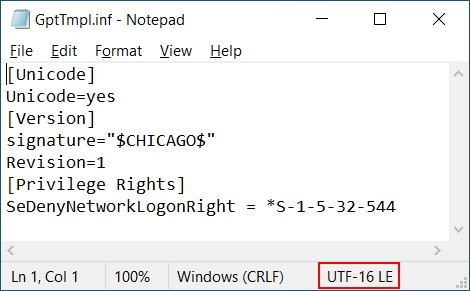
Looking at the file, we can see it is like any old school .inf file with sections in square brackets. The last section is where the actual Logon Rights are stored. In this case; we asked for Deny Access to this computer from the network to be set for administrators. The system translated that to DenyNetworkLogonRight = *S-1-5-32-544.
The system has converted our plain text request into this instruction. The SID shown here is simply a translation from the list of well known SIDs for Administrator.
What’s inside a Backup-GPO?
Let’s back up our example GPO using the Backup-GPO command in powershell:
> Backup-GPO -name NewGPO -path C:\users\Administrator\AppData\Local\Temp
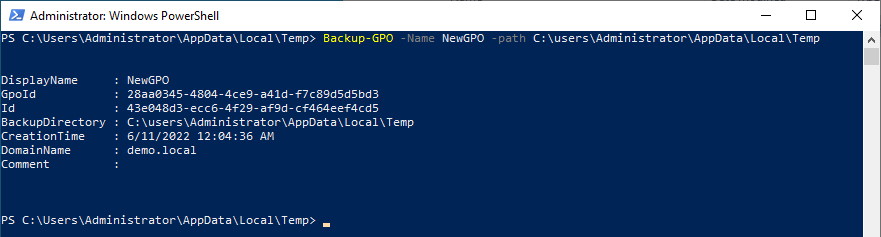
This creates a file structure within the Administrator’s temp folder. It creates a folder with a newly created random guid (referred to as the Backup ID). The original GPO’s GUID {28AA0345-4804-4CE9-A41D-F7C89D5D5BD3} is stored in the backup as “GpoID” and can be seen in the results of the command above (and in some of the GPO’s backed up files – more on that in a moment).
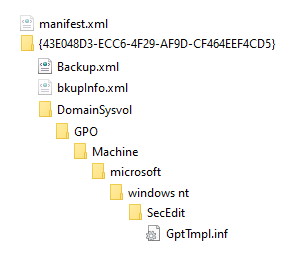
The backed up GPO has been saved under the new ID Folder name of {43E048D3-ECC6-4F29-AF9D-CF464EEF4CD5}.
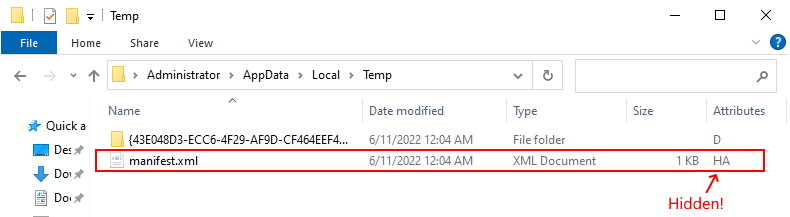
Be aware that there are two extra hidden XML files that get created after running a Backup-GPO command.
The first file is outside the GUID folder at the folder where the command ran, The file is called Manifest.xml and is very important if you wish to import the GPO somewhere else.
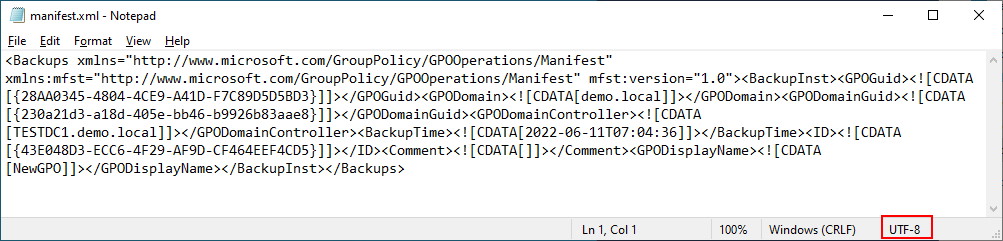
The manifest.xml file is quite ugly. It is in XML, but it will probably show as one big long line of unbroken text. Here’s a version of our manifest.xml (encoding is UTF-8) with wordwrap turned on in Notepad:
 This is still quite ugly. Let’s grab this and put it in an XML indented format:
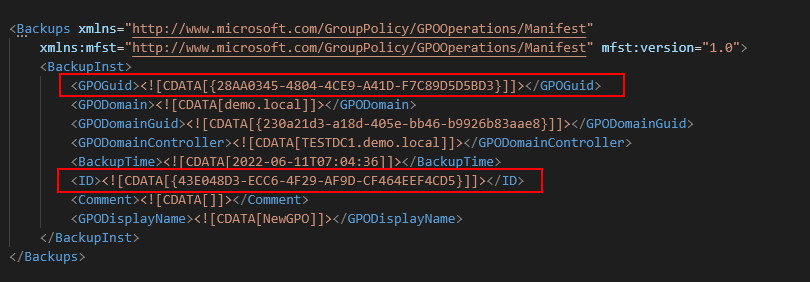 Note the values in the structure. The GPOGuid is the GUID of our original GPO as it is written in AD.
The ID value is the same as the folder name that was written to inside our temp folder.
In short, the Manifest.xml file is used by the import-gpo routine to provide instructions on where GPOs that have been backed up can be found.
It also contains information on the domain and domain controller it was backed up from. You will also find the time and the display name of the original GPO. Each GPO backed up will be found inside a <BackupInst> tag set.
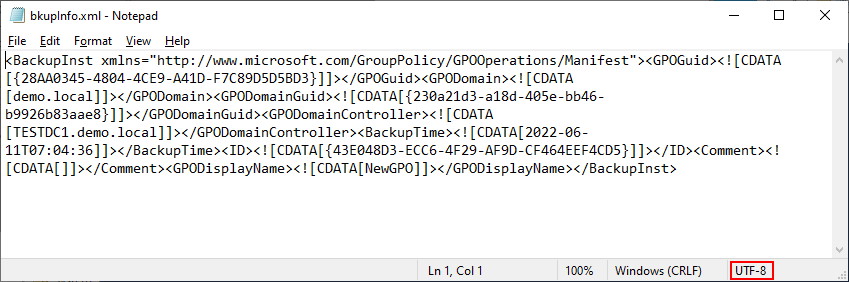
As mentioned earlier, there is another hidden file. This file is in the GUID folder and called bkupinfo.xml. It looks remarkably similar to the Manifest file with one less tag. The first tag <backups> is not present – The Backups tag is only found in the manifest file and is used to encapsulate each GPO that can be found at the backed up folder location along with its associated GUID/ID pair. In our case, we only have one GPO, so the file looks almost identical (without the <Backups> tag).
The contents of the bkupinfo.xml file inside the GUID folder structure look like this (note the encoding for this file is UTF-8)
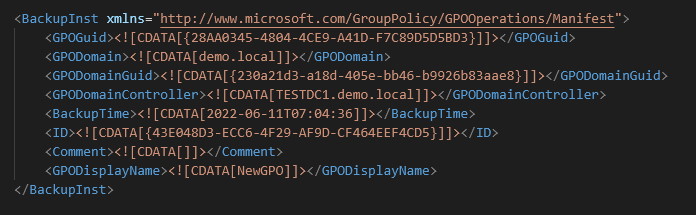
 Again, the format is a little lack luster, for educational purposes, here’s how it looks formatted.
NOTE: Both the bkupInfo.xml and manifest.xml must be presented on one continuous unbroken line otherwise import-gpo will crash and the powershell client will terminate.
Before we get to the actual GPO config, there’s one more file in the GUID folder that is important. Backup.xml (Encoding UTF-8).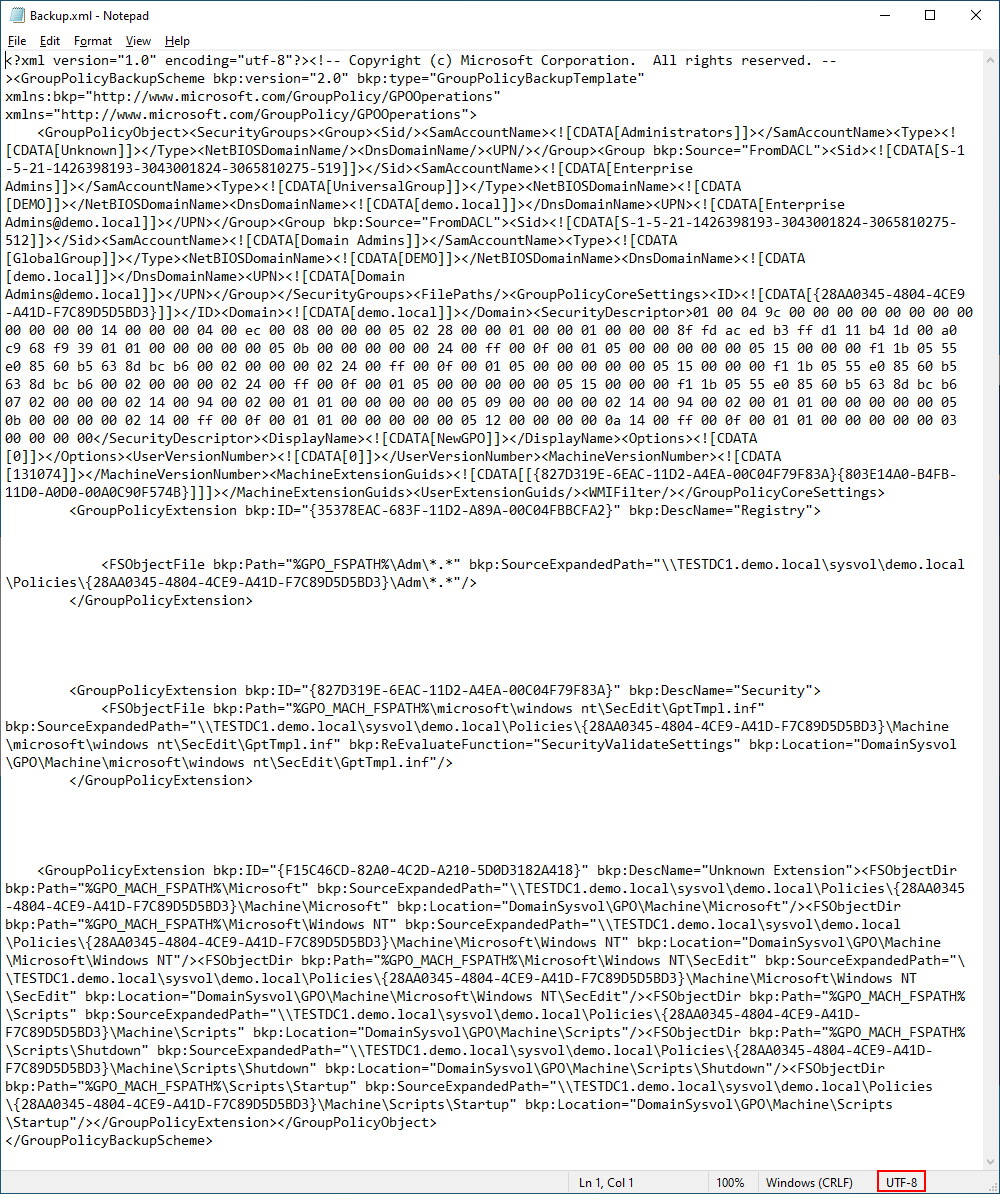 For the sake of readability in this article, let’s present this file in a more readable format.
NOTE: For this file to be able to be imported, you must not break some tags over new lines or the import command will completely crash the powershell session; eg; The file formatted as below would cause the client to crash. You can remove the empty lines without a problem.
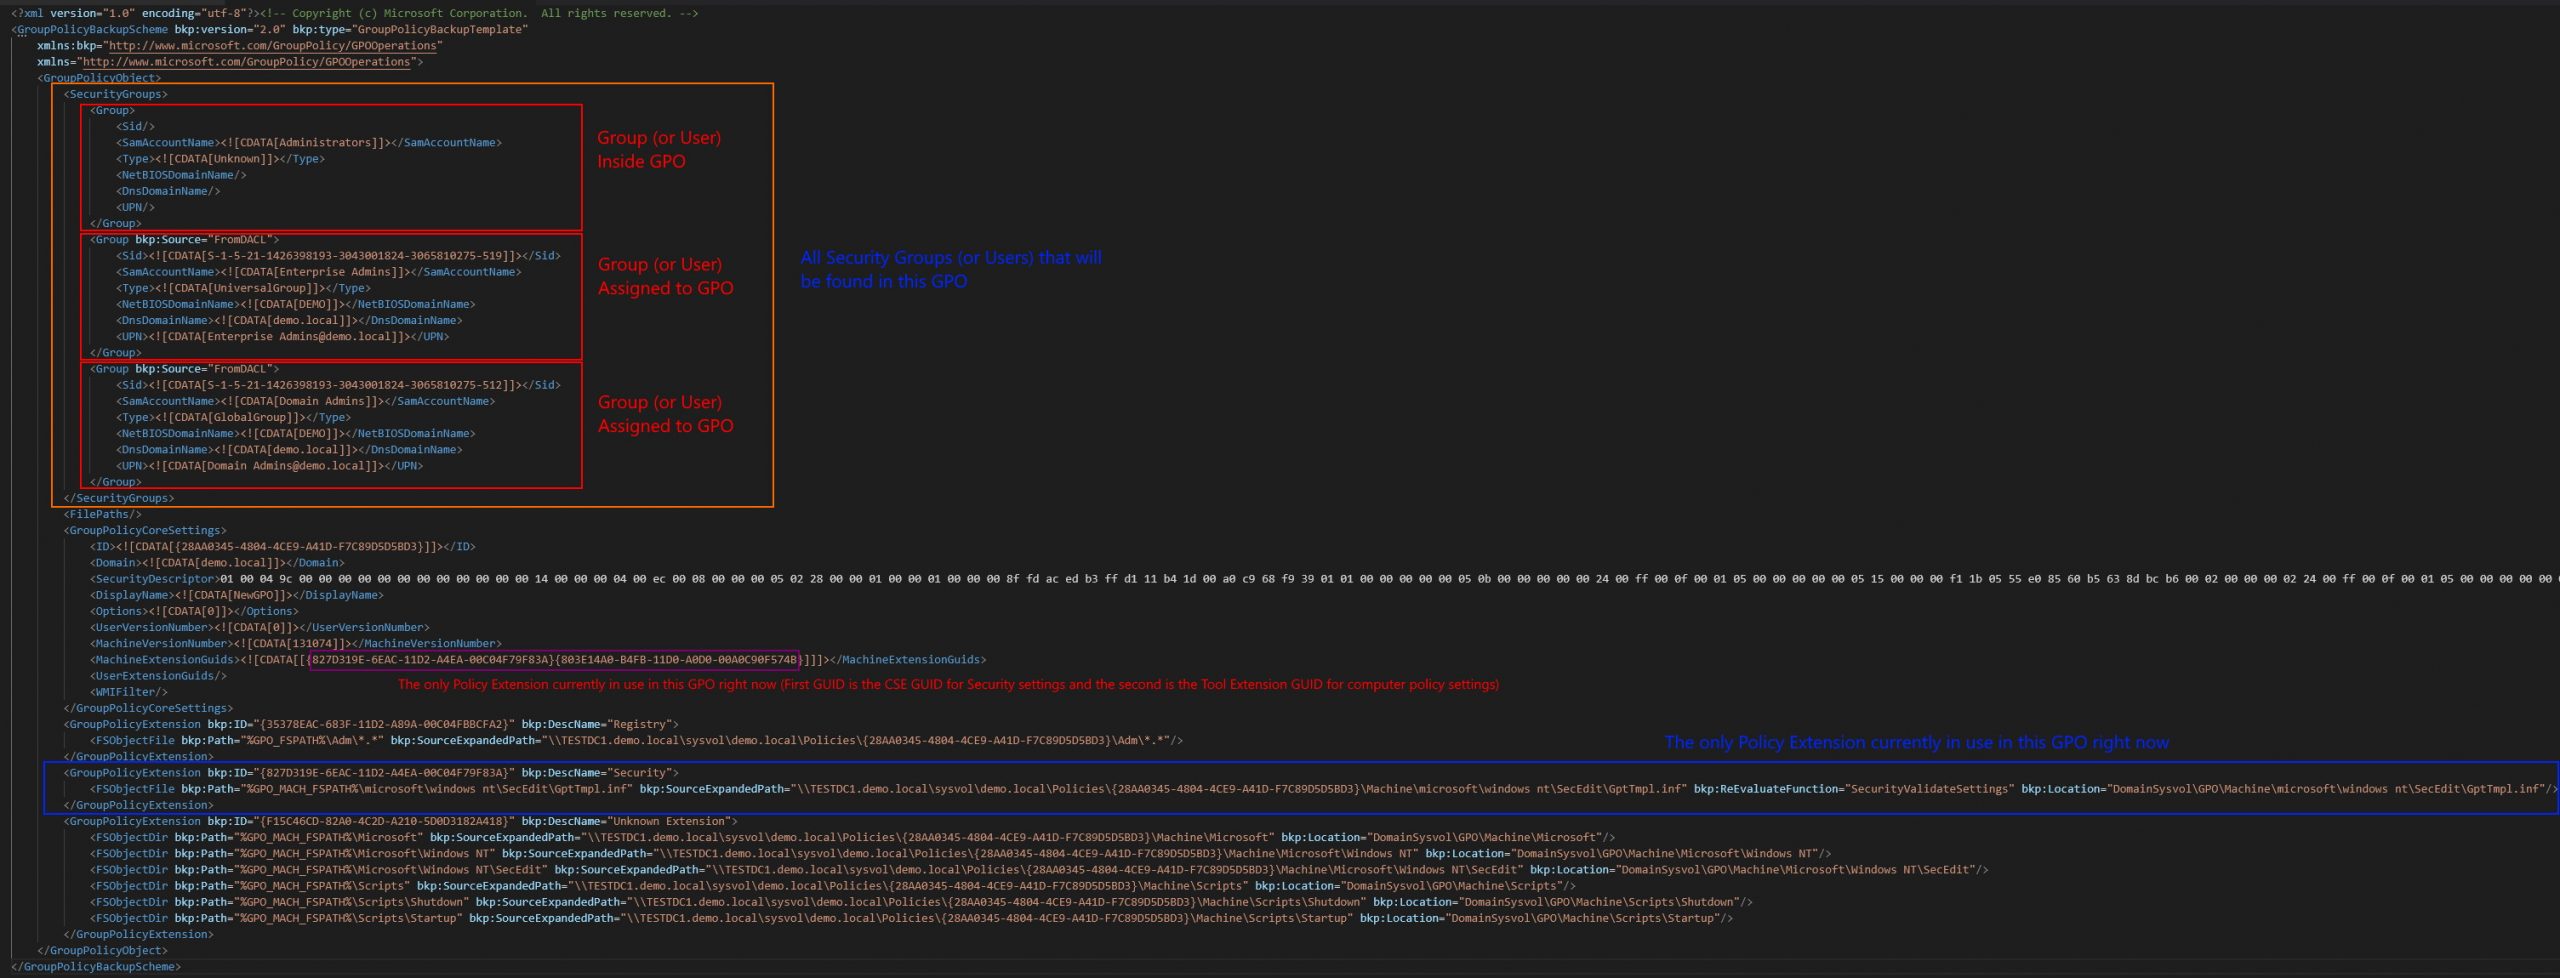 There’s a little bit to unpack from the screenshot above.This backup.xml file contains a few things:
It outlines the security groups and users that will be used in the GPO. It is interesting to note that even if a User is present, it will only appear in the SecurityGroups section labeled as a “Group”.
The purpose of the SecuritGroups section is so that if you have custom user/group names inside your policy, they can be transformed if imported into a new domain. Be aware that the entire SecurityGroups section MUST be on a single unbroken line otherwise Import-GPO will crash and terminate the current powershell session.
The purpose of the GroupPolicyCoreSettings is to capture some of the basic GPO settings, Domain, original GPO GUID (stored as ID) and any machine policies that are in use. In our example, we are only using the one policy for the Security section of our GPO – {827D319E-6EAC-11D2-A4EA-00C04F79F83A}{803E14A0-B4FB-11D0-A0D0-00A0C90F574B}. This section MUST all be on a single unbroken line otherwise Import-GPO will crash and terminate the current powershell session.
In our example, we are actually only using the Extension highlighted in blue, so we really don’t need the other extensions for import-gpo to work. In our scenario, we could safely remove the other extensions below the extension highlighted in blue. Be aware that the entire GPO Extension lines MUST be in a continuous unbroken line otherwise Import-GPO will crash and terminate the current powershell session.
Finally, we have the gpttmpl.inf file that is stored in the same subfolder location as the live GPO. The file also is identical to what was present in SYSVOL. Be aware that this file MUST be encoded as UTF-16LE (Unicode).
To build our GPO to set just our User Rights assignment, the minimum number of files is 4 (2 hidden):
Manifest.xml in the root of the folder where the backup was created (outside the GUID folder) – hidden.
backup.xml inside the root of the GUID folder
bkupinfo.xml inside the root of the GUID folder – hidden.
GptTmpl.inf in the same subfolder structure as the oriignal real live GPO (<Guid>\DomainSysvol\GPO\Machine\microsoft\windows nt\SecEdit)
The structure looks like this:
The Backup.inf file
What if I told you… we could build this all out and remove most of the values present in the backup.inf and still import fine with import-gpo ? Tune in next week for the next part in this series to learn more. I’ll put together some example template files.
In the mean time, here’s a sneak peak at the script that will be discussed:
https://github.com/Jigsolving/powershell/blob/main/User%20Rights%20Assignment%20GPO/create-customURAGPO.ps1
Happy GPOing.
A full list of User Rights Assignment
The table below lists all the User Rights Assignments and their translated constant values.
Each Policy setting is linked to a page over at Microsoft (***except one – there seems to be an error over there).
Notes:
*You MUST specify at least Administrator for this right
** Administrators and SERVICE MUST be granted this right
*** The associated description for this right is missing over at Microsoft at time of writing.
The featured photo in this post: Part of a photo by Francisco Jesús Navarro Hernández on Unsplash


